📖 MVC Updating Database Records
A common practice for updating and deleting records in a database is to add update and delete links to scripts that can manage those tasks. If you are working with a list of items from the database, it is customary to provide links for each item at the end of each iteration to allow the user to select a delete or update action. The delete and update links will point to a delete or update script and pass the corresponding primary key (id) to that script.
In this MVC framework, we will need to add code to manage the process. This code will be added to the existing controller, model and new views will be added. We are creating a basic Create - Read - Update - Delete (CRUD) application. For each of these processes we will need a user form to collect the data (view), a controller to require the appropriate process and a model to manage the database interaction.
Insert New Products
New records are inserted into the database using a form to collect the required data then sending the data to the database using an insert statement managed by the model class. This for will need fields that correspond with the database fields in the database table. The controller will manage the process by connecting the appropriate database process with the requested action. Lastly, we will redirect the user to the page displaying the new record.
Insert Model
The model for this action needs to write a new record to the database. This is known as an INSERT statement. We will use a prepared statement similar to the ones used in the find() and getData() actions of the Product model but tailored for inserting new records. Add the following action to the Product model class. Notice the question marks (?) in the $sql. These are placeholders used by prepared statements to improve security by resisting SQL injections. The values for these placeholders are contained in the bindValue() methods. You can review the article on PHP Prepared Statements for a refresher on prepared statements. Notice the last line in this action returns the ID of the last inserted record. We'll use this to redirect to the show page for this record.
<?php
...
public function insert(array $data): int|bool
    {
        // validate form data
        if ( ! $this->validate($data) ) {
            return false;
        }

        $sql = "INSERT INTO `products` (name, description) VALUES (?, ?)";

        $conn = $this->getConnection();

        $stmt = $conn->prepare($sql);

        $stmt->bindValue(1, $data["name"], PDO::PARAM_STR);
        $stmt->bindValue(2, $data["description"], PDO::PARAM_STR);

        $stmt->execute();

        return $conn->lastInsertId();
    }
Form Validation
An important element of any online app that uses user input for database records is form (data) validation. We must check the form submitted data for acceptable values. If a user omits a required form field, we must send the form with the user information back to the user with an error message prompting the user to make corrections. In the Product model, just before we insert the new record to the database (shown above), we want to process the form data for errors. In this case we are only checking for empty field(s), but there are similar validation methods to check for malicious code.
Place this in the Product model before the insert() action to validate the form data. In this case, the data will not be stored in the database if the name field is empty. Instead, the form is returned to the user.
<?php
...
    // create an empty array to store errors
    protected array $errors = [];

    // method to add errors when validation fails
    protected function addError(string $field, string $message): void
    {
        $this->errors[$field] = $message;
    }

    // method to test form data against validation requirements
    protected function validate(array $data): bool
    {
        if (empty($data["name"])) {

            $this->addError("name", "Required");

        }

        return empty($this->errors);
    }

    // method for returning errors on validation
    public function getErrors(): array
    {
        return $this->errors;
    }
New Record View
In the views/Products folder, create a new file and name it new.php. This will be for our new form. Be sure to add a link back to the Home and Products pages. Notice how we insert error messages into the form if a form was submitted with invalid information.
<nav>
    <ul>
        <li><a href="/">Home</a></li>
        <li><a href="/products">Products</a></li>
    </ul>
</nav>

<h1>New Product</h1>

<form action="/products/create" method="post">

    <label for="name">Name
        <!-- add error messages for form errors -->
        <?php if (isset($errors["name"])) : ?>
            <span style="color: red;"><?= $errors["name"] ?></span>
        <?php endif; ?>
    </label>
    <input type="text" name="name" id="name">

    <label for="description">Description</label>
    <textarea name="description" id="description" cols="30" rows="10"></textarea>

    <button>Save</button>

</form>
This form should now be available in the browser but without CSS styles, it is probably not very attractive. In order to quickly add style without a lot of work, let's add a classless style sheet using water.css. You can find information about water.css online. Add the link to the style sheet CDN to the head of your header.php file.
<link rel="stylesheet" href="https://cdn.jsdelivr.net/npm/water.css@2/out/water.css">Make sure you add a link to the Products->index.php page to the new product page using the controller/action pattern in the URL.
<a href="/products/new">New Product</a>Insert New Record Controller
We begin by adding a new() action method to the Products controller to display the new form. We will be adding a model call to the database to insert the new record and a view call similar to the existing index and show classes to show the new empty form. This form view does not exist, so we will create a new one. Once we create this new() function, we can create the new view and display it in the browser. You can see the new view code below.
We will also need a new action that instructs the model to write the new data to the database. To handle this, we will create a new create() method in the Products class of the Products controller. The create() action method will need an array to pass to the model with the form data captured in the array. In this case we have 2 data elements; name and description.
<?php
...
    public function new()
    {
        // display empty form for new product
        $viewer = new Viewer;

        echo $viewer->render("shared/header.php", [
            "title" => "New Product"
        ]);

        echo $viewer->render("Products/new.php");
    }

    public function create()
    {
        // create a data array to hold form field data
        $data = [
            "name" => $_POST["name"],
            "description" => $_POST["description"]
        ];

        $model = new Product;

        // capture the last ID inserted into the db for a new record
        $insertID = $model->insert($data);

        // used to check successful database insert of new record
        if ($insertID) {

            // use insertID to redirect the user to the product page for the new product
            header("Location: /products/{$insertID}/show");
            exit;

        } else {

            // default form view for form with errors displayed
            $viewer = new Viewer;

            echo $viewer->render("shared/header.php", [
                "title" => "New Product"
            ]);

            echo $viewer->render("Products/new.php", [
                "errors" => $model->getErrors()
            ]);
        }
    }
Update Existing Products
Updating the existing database records is similar to the process of inserting a new record except we will load the existing record to the form for the user to edit. Then when we send the data to the database, we will send it using an update statement so the existing record will be updated rather than a new record be inserted. This will require us to provide the unique identifier (id) for the record being edited. Again, after the record is updated, we will display the page with the new information.
Update Record Controller
When editing an existing record, you need the ID of the record to pull the correct record from the database. Since the show() action in the Products controller already has the product ID available, we can use it as a template for the new edit() action. Begin by copying the show() action in the Products controller and renaming the copy edit().
We still want the ID from the Product model but now we want to change the header view to show a page title called Edit Product. We also want the viewer to render() the new Products/edit.php page. Make these changes to the new edit() action method.
Managing the Edit Page
<?php
...
    public function edit(string $id = NULL)
    {
        $model = new Product;

        $product = $model->find($id);

        if ($product === false) {

            throw new PageNotFoundException("Product not found");

        }

        $viewer = new Viewer;

        echo $viewer->render("shared/header.php", [
            "title" => "Edit Product"
        ]);

        echo $viewer->render("Products/edit.php", [
            "product" => $product
        ]);
    }
In addition to showing the edit view with the existing database information, we need a controller that can process the actual update for the record. This is similar to the create() action method we used for the new() record process, so we can begin by using a copy of that action method. Copy the create() action method and paste the copy back into the Products.php file just after the edit() action method. Edit the new method as follows.
Rename the method to update and add a string $id argument to pass the record id to the method. Use $product variable for form data. Add a conditional statement to redirect on successful update from the update() model. Edit the header view title property to show "Edit Product" since this will be the Edit Product page. Also, edit the page render() to include the Products/edit.php page.
Managing the Update
<?php
...
    public function update(string $id)
    {
        $model = new Product;

        // gets data from database for default form
        $product = $model->find($id);

        if ($product === false) {

            throw new PageNotFoundException("Product not found");

        }

        // replaces database info for sticky forms
        $product["name"] = $_POST["name"];
        $product["description"] = empty($_POST["description"]) ? null : $_POST["description"];

        if ($model->update($id, $product)) {

            header("Location: /products/{$id}/show");
            exit;

        } else {

            $viewer = new Viewer;

            echo $viewer->render("shared/header.php", [
                "title" => "Edit Product"
            ]);

            echo $viewer->render("Products/edit.php", [
                "errors" => $model->getErrors(),
                "product" => $product
            ]);
        }
    }
Update Model
The update model is used to send updated information to the database to update existing records. First, the data must be validated. Next, the id is removed from the $data array as it is already being passed as $id. The $fields are built from the array keys as field names from the $data array then assembled into prepared statement SET syntax. Once the query is built, we then pass the data using the bind parameters. This should return a boolean value to the Products controller.
Updating the Database
<?php
...
    public function update(string $id, array $data): bool
    {
        if ( ! $this->validate($data) ) {
            return false;
        }

        unset($data["id"]);

        $fields = array_keys($data);

        array_walk($fields, function (&$value) {
            $value = "$value = ?";
        });

        $sql = "UPDATE `products` SET " . implode(", ", $fields) . " WHERE id = ?";

        $conn = $this->getConnection();

        $stmt = $conn->prepare($sql);

        $stmt->bindValue(1, $data["name"], PDO::PARAM_STR);
        $stmt->bindValue(2, $data["description"], PDO::PARAM_STR);
        $stmt->bindValue(3, $id, PDO::PARAM_INT);

        return $stmt->execute();
    }
Edit View
There are 3 views effected here. Since we already have the new view with the blank form, let's use the form for our edit page as well. First, extract the form contents (not the form tags) from the new.php page view. Now create a new view called form.php and paste the form contents into this file. Next, we create a new file called edit.php. In this last file, we are going to add the page view code to manage the options for updating an existing record and the related content.
new.php
<nav>
    <ul>
        <li><a href="/">Home</a></li>
        <li><a href="/products">Products</a></li>
    </ul>
</nav>

<h1>New Product</h1>

<form action="/products/create" method="post">

<!-- include the form contents from the new form.php -->
<?php require "form.php" ?>

</form>

</body>
</html>
form.php
Now we can access the form from multiple pages.
<label for="name">Name
    <?php if (isset($errors["name"])) : ?>
        <span style="color: red;"><?= $errors["name"] ?></span>
    <?php endif; ?>
</label>
<input type="text" name="name" id="name" value="<?= $product["name"] ?? "" ?>">

<label for="description">Description</label>
<textarea name="description" id="description" cols="30" rows="10"><?= $product["description"] ?? "" ?></textarea>

<button>Save</button>
edit.php
Notice the changes to this page including the form action attribute pointing to the products update action and the cancel link.
<h1>Edit Product Page</h1>

<form action="/products/<?= $product["id"] ?>/update" method="post">

<!-- include the form contents from the new form.php -->
<?php require "form.php" ?>

</form>

<p><a href="/products/<?= $product["id"] ?>/show">Cancel</a></p>

</body>
</html>
Delete Products
This is the last function of our CRUD app where we provide users the ability to remove records from the database. This is generally considered a risky process in that records could be accidentally removed by careless or unsuspecting users. We will build in a certain amount of safety redundancy into the user interface to make sure the user understands what they are doing is not reversible. After the record is deleted, we will redirect the user back to the list of available records.
In this part of the app process, we will ask our users too verify they want a record deleted before we actually delete it since this process cannot be reversed once it has been processed. So, we will add Delete link to the Show Product page which will request the Delete page to display. On the initial delete page, we will provide the users with a delete verify button. This insures a 2 step process. You can embellish the user messaging to reinforce the importance of this activity as needed.
Delete Record Controller
The delete action of the Products controller will initially display the delete page along with the verification message. This page will use a form to submit the verification using the POST method to the server which we can the check for in this controller. If the delete request is using the POST method, we then call the delete action of the Product model to carry out the request.
<?php
...
    public function delete(string $id)
    {
        $model = new Product;

        $product = $model->find($id);

        // this if block checks the request method of the delete request
        // if the request method is post, the query will be executed
        if ($_SERVER["REQUEST_METHOD"] === "POST") {

            $model->delete($id);

            header("Location: /products/index");
            exit;
        }

        // this block displays the initial delete verification page
        $viewer = new Viewer;

        echo $viewer->render("shared/header.php", [
            "title" => "Delete Product"
        ]);

        echo $viewer->render("Products/delete.php", [
            "product" => $product
        ]);
    }
Delete Model
Add the delete action below to the Product.php model file to carry out the record deletion task.
<?php
...
    public function delete(string $id): bool
    {
        $sql = "DELETE FROM `products` WHERE id = :id";

        $conn = $this->getConnection();

        $stmt = $conn->prepare($sql);

        $stmt->bindValue(":id", $id, PDO::PARAM_INT);

        return $stmt->execute();
    }
Delete View
This is a new page create from a copy of the edit.php file. Take out the edit form and replace it with the verification prompt and button. Make sure to also edit the action attribute of the form element to point to the delete action in the URL.
<h1>Delete Product</h1>

<form action="/products/<?= $product["id"] ?>/delete" method="post">

<p>Are you sure you want to delete this product?</p>

<button>Yes</button>

</form>

<p><a href="/products/<?= $product["id"] ?>/show">Cancel</a></p>

</body>
</html>
Conclusion
There are many ways to accomplish this functionality but this is the way many PHP libraries approach the problem. There is also room to enhance this code by refactoring the code into better organizational structure by extracting some of the repeating code into parent classes. The goal here is to show you how this is typically done in the existing framework/libraries. Since they already have excellent working code with much more functionality, I recommend learning one of those as you move forward.
At the end of this activity you should have a file system that looks something like this. The only new files are the new views.
Sample File Directory Structure
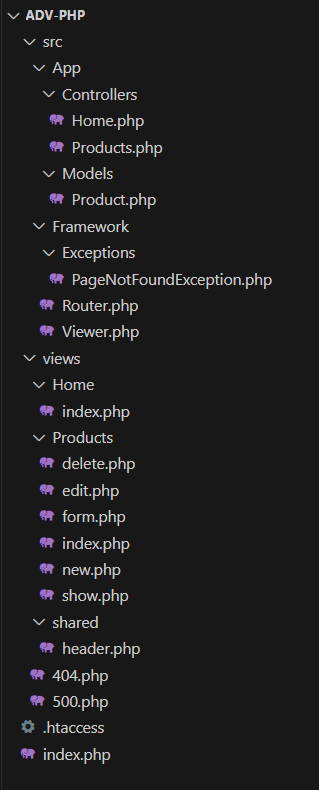
↧ ERROR HANDLING (SITE ROOT)
↳ src
| ↳ App
| | ↳ Controllers
| | | ↳ Home.php
| | | ↳ Products.php
| | ↳ Models
| | | ↳ Product.php
| ↳ Framework
| | ↳ Exceptions
| | | ↳ PageNotFoundException.php
| | | ↳ Router.php
| | | ↳ Viewer.php
↳ views
| ↳ Home
| | ↳ index.php
| ↳ Products
| | ↳ delete.php
| | ↳ edit.php
| | ↳ form.php
| | ↳ index.php
| | ↳ new.php
| | ↳ show.php
| ↳ shared
| | ↳ header.php
| ↳ 404.php
| ↳ 500.php
↳ .htaccess
↳ index.php