📖 PHP Insert MySQL
This guide walks you through how to insert user-submitted form data into a MySQL database using PHP and PDO. The example uses a simplified MVC-style structure to keep your code modular, readable, and easy to maintain.
🧠 Pro Tip: Before you begin, create a feature branch in your Git repository to isolate this work from your main codebase. This keeps your main branch clean and lets you experiment safely:
git checkout -b feature-user-insertProject Structure
project-root/
    ├── profile.php                 ← entry point that loads controller/view
    ├── register.php                ← entry point that loads controller/view
    ├── controllers/
    │   └── UserController.php      ← handles form logic and insertion
    ├── models/
    │   ├── db_connect.php          ← PDO database connection
    │   └── UserModel.php           ← contains the INSERT query
    ├── views/
    │   ├── register.php            ← form UI
    │   └── partials/
    │       ├── header.php          ← reusable site header and opening HTML
    │       ├── footer.php          ← reusable footer and closing HTML
    │       └── profile-form.php    ← form fields (name, email)
What It Is
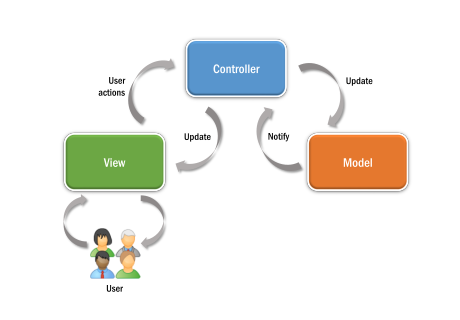
This approach follows an MVC-like pattern — separating form display, user interaction logic, and data persistence into clearly defined layers. While not using a full PHP framework, the structure supports maintainability and testing by clearly splitting responsibilities.
profile.php- Acts as a front controller. It includes the main controller and calls the
show()method, which loads logic and renders the page. register.php- Acts as a front controller. It includes the main controller and calls the
register()method, which loads logic and renders the form. UserController.php- Validates input, processes form actions, and prepares view data.
UserModel.php- Handles all database interaction via secure PDO queries.
Why It Matters
Separating logic into controller and model files helps you:
- Avoid mixing HTML with business logic
- Enable code reuse and testability
- Follow professional conventions that map to modern PHP frameworks
- Make debugging and expansion easier
This version uses a class-based controller structure to model real-world PHP application flow. It helps reinforce how MVC frameworks like Laravel organize user-facing logic.
🧠 Why structure it this way?
Separating the responsibilities makes your code more reusable and maintainable. It also helps prevent mixing form logic directly into your HTML pages — a common beginner pitfall.
Step 1: Load the Form
Start by creating a register.php file to load the registration form and handle submission:
<?php
require_once 'controllers/UserController.php';

$controller = new UserController();
$controller->register();
Here's what's happening in these lines:
require_once- Loads the controller file so the class definition is available. This prevents the file from being loaded more than once if included elsewhere.
new UserController()- Creates a new instance (object) of the
UserControllerclass. This object now has access to all methods defined in the class. $controller->register()- Uses the object operator (
->) to call theregister()method from the instantiated controller. This method then loads the registration form view.
The controller checks the request method:
- GET → Load the registration form
- POST → Sanitize inputs, validate data, insert the new user, or show errors
Form UI (views/profile/create.php)
<?php include 'views/partials/header.php'; ?>
<h2>Register</h2>

<?php if (!empty($errors['db'])): ?>
    <p class="error"><?= htmlspecialchars($errors['db']) ?></p>
<?php endif; ?>

<form method="POST" action="register.php">
    <?php include 'views/profile/partials/profile-form.php'; ?>
    <button type="submit">Register</button>
</form>

<?php include 'views/partials/footer.php'; ?>
This view template shows a styled form with dynamic error handling. The form fields are loaded from profile-form.php, making them reusable across different views.
💡 Hint: Use an $errors array to pass validation or database errors from your controller to the view.
Understanding Partial Views
To keep your templates clean and reusable, shared elements like the header, footer, and form fields are split into smaller files inside views/partials/:
header.php— contains the opening HTML tags, navigation, and page setupfooter.php— contains the closing tags and footer contentprofile-form.php— holds the input fields for name and email
Using partials avoids repetition and ensures a consistent layout across all pages. You can include them using PHP's include statement:
<?php include 'views/partials/header.php'; ?>
<!-- your page content -->
<?php include 'views/partials/footer.php'; ?>
This modular approach makes it easy to update shared content in one place and have the changes reflect across your site.
Form Partial (views/partials/profile-form.php)
<div class="mb-3">
    <label for="name">Name</label>
    <input class="form-control" id="name" name="name"
        value="<?= htmlspecialchars($post['name'] ?? '') ?>">
    <?php if (!empty($errors['name'])): ?>
        <p class="error"><?= htmlspecialchars($errors['name']) ?></p>
    <?php endif; ?>
</div>

<div class="mb-3">
    <label for="email">Email</label>
    <input class="form-control" id="email" name="email"
        value="<?= htmlspecialchars($post['email'] ?? '') ?>">
    <?php if (!empty($errors['email'])): ?>
        <p class="error"><?= htmlspecialchars($errors['email']) ?></p>
    <?php endif; ?>
</div>
This partial handles the form fields and any validation errors. It uses htmlspecialchars() to prevent XSS attacks by escaping user input.
Step 2: Process Form Logic (Controller Class)
The controller handles the POST request, sanitizes and validates inputs, and passes them to the model to insert into the database:
// controllers/UserController.php
require_once 'models/UserModel.php';

class UserController {
    // This method is public so it can be accessed from outside this class
    public function register() {
        $post = ['name' => '', 'email' => ''];
        $errors = [];

        if ($_SERVER['REQUEST_METHOD'] === 'POST') {
            $post['name'] = trim($_POST['name'] ?? '');
            $post['email'] = trim($_POST['email'] ?? '');

            $errors = $this->validate($post);

            if (empty($errors)) {
                $userId = create_user($post);  // Save to DB

                if ($userId) {
                    header("Location: profile.php?id=$userId");
                    exit;
                } else {
                    $errors['db'] = '❌ Failed to save user to database.';
                }
            }
        }

        // Show the form, with or without errors
        require 'views/profile/create.php';
    }

    // This helper method is private – only accessible inside this class
    private function validate($data) {
        $errors = [];

        if ($data['name'] === '') {
            $errors['name'] = 'Name is required.';
        }

        if (!filter_var($data['email'], FILTER_VALIDATE_EMAIL)) {
            $errors['email'] = 'Valid email is required.';
        }

        return $errors;
    }
}
public- Makes the method accessible from outside the class. In this example,
register()is public so it can be called fromregister.php. private- Restricts access to within the class itself. The
validate()method is private because it should only be used internally by theregister()method. UserController::register()- Handles the full registration flow. It initializes the
$postand$errorsarrays, processes$_POSTinput, calls the privatevalidate()method, and if valid, passes the data tocreate_user()in the model. On success, it redirects to the user's profile page using the returned ID. UserController::validate()- Validates form input by checking that the
namefield is not empty and that theemailfield is properly formatted. Returns an array of error messages if validation fails. This method is private and used internally by the controller.
This function runs automatically when register.php is loaded. If the form was submitted, it runs validation, then inserts the data using the create_user() model function. If there are errors, they are passed to the view using the $errors array.
💡 Note: This controller doesn't handle HTML — it just prepares the data and logic. The next section shows how the model handles the actual database insert.
Step 3: Insert into the Database (Model)
This function performs the actual insertion into the database using a secure, parameterized SQL statement:
// models/UserModel.php
require_once 'db_connect.php';

function create_user($post) {
    global $pdo;

    $sql = "INSERT INTO users (name, email) VALUES (:name, :email)";
    $stmt = $pdo->prepare($sql);

    $success = $stmt->execute([
        ':name'  => $post['name'],
        ':email' => $post['email'],
    ]);

    return $success ? $pdo->lastInsertId() : false;
}
This function accepts an array of user data (from the controller), prepares an SQL INSERT query using named parameters, and safely executes it. If successful, it returns the ID of the new user — otherwise it returns false.
💡 Why use :name and :email? These are placeholders used in prepared statements. They help prevent SQL injection by keeping user input separate from SQL logic.
With this structure, your model stays focused on database operations and doesn't contain any HTML or display code — making it easier to reuse and test.
Keep Building
This article showed how to build a working form that inserts data into a MySQL database using the MVC pattern. As a next step, try expanding your project with profile views, updates or deletions. The same patterns apply — and building them out now will make your app feel complete and professional.
Step 4: Show the New Profile
Once the user is registered, the app redirects to profile.php?id=123 to display their profile using the same MVC flow. Here's how that works:
profile.php (Entry Point)
<?php
require_once 'controllers/UserController.php';

$controller = new UserController();
$controller->show();
This file acts as the entry point. It loads the controller and calls the show() method, which prepares user data and loads the view.
UserController::show() (Controller Method)
public function show() {
    $id = $_GET['id'] ?? null;

    if (!$id) {
        echo "Missing ID";
        exit;
    }

    $user = get_user_by_id($id);

    if (!$user) {
        echo "User not found";
        exit;
    }

    require 'views/profile/show.php';
}
This method gets the user ID from the query string, fetches the user from the model, and loads the profile view.
get_user_by_id() (Model Function)
function get_user_by_id($id) {
    global $pdo;

    $sql = "SELECT * FROM users WHERE id = :id";
    $stmt = $pdo->prepare($sql);
    $stmt->execute([':id' => $id]);

    return $stmt->fetch(PDO::FETCH_ASSOC);
}
This model function queries the database using the user’s ID and returns their record as an associative array.
views/profile/show.php (View File)
<?php include 'views/partials/header.php'; ?>

<h2>User Profile</h2>

<dl>
    <dt>Username</dt>
    <dd><?= htmlspecialchars($user['username']) ?></dd>

    <dt>Password</dt>
    <dd><?= htmlspecialchars($user['password']) ?></dd>
</dl>

<?php include 'views/partials/footer.php'; ?>
This view displays the user’s profile using the data loaded by the controller. It uses semantic tags and escapes output to prevent XSS.
Last updated: August 2, 2025 at 9:11 PM